Your Basket is Empty

Croissant Dough
If you want to make it all on the same day allow plenty of time for chilling and resting, at least 7 hours from start to finish. Ideally the dough should be chilled and rested overnight before wrapping around the butter and rolling out but if not it needs to rest in the fridge for a minimum of two hours.
- a tray that will fit in the fridge and some large plastic freezer bags
- a couple of lightly buttered and floured or parchment lined oven trays
Ingredients
500g strong white flour
20g fresh yeast or 10g dried yeast
10g salt
50g caster sugar
40g softened unsalted butter
140g full fat milk
140g warm water
250g good quality unsalted butter, cold from the fridge
Egg wash - 1 egg mixed with a pinch salt and splash of water an hour before you need it
Method
Making the Dough
Put the flour into a large bowl. Stir in the dried yeast, salt and sugar. If using fresh yeast, dissolve it in the milk and water. Rub in the softened butter then add the milk and water and mix with one hand using a scraper or large spoon until the dough comes together roughly.
Transfer the dough onto a clean work surface and knead until the dough feels smooth and elastic, about 3 minutes. Don't add any extra flour, use a scraper to keep the dough from sticking too much until it leaves the work surface cleanly.
Note: The gluten doesn't need to be developed by too much kneading at this stage, as the folding and rolling later will strengthen it further and if it's too strong rolling out will be difficult.
Shape the dough into a ball. Cut a cross in the top with a knife and put the dough back into the lightly floured bowl. Cover with a plastic bag and rest in the fridge for at least two hours but preferably overnight.
Laminating the Dough
When the dough has finished resting, take the 250g pack of butter out of the fridge. Open the wrapper out flat and with the butter still in the middle cover with greaseproof paper. Flatten the butter into a square with a rolling pin, flipping over with a quarter turn half way through, until about 18cm square and 1cm thick. Even up the sides.
Note: The butter and the dough should be the same consistency, press each to check, they should feel the same.
Lightly flour your surface. Take the dough out of the bowl and starting from the centre roll out the corners where you have made your cross so that you have a 26 cm square of dough that's a bit thicker in the middle.
Lift the butter onto the dough using the paper, so that each corner just touches the mid-point on each side. Avoid handling the butter as it needs to be kept as cold as possible. Fold a corner of the dough up and over the butter so that it reaches the middle, fold the other three corner flaps of the dough up over the butter, so that they overlap slightly to enclose it and give it a few taps with your rolling pin to seal and flatten it.
Gently start rolling lengthways until you have a rectangle about 3 times the original length (about 20 x 60cm). Use long stokes and even pressure, roll from the middle up and down without rolling over the ends. Don't press too hard and make sure that the dough isn't sticking to the table or the pin. If it is, use a little more flour underneath. If the butter seems to be softening refrigerate to firm up before continuing. It's important to work quickly and to keep the dough cool.
Brush off excess flour to avoid incorporating it into the dough. Fold the dough into thirds, folding up from the bottom then down from the top. Place the folded dough onto your tray, cover with a freezer bag and rest in the fridge for 20-30 minutes.
Take the rested dough out of the fridge and put on a lightly floured work surface with the short side towards you. Roll lengthways as before then fold into thirds again. Leave to rest for another 20-30 minutes in the fridge.
Repeat the rolling and resting one more time, making three times in total. Alternatively you can leave the dough in the fridge overnight after the third turn and continue with the next step the following day.
Shaping the Croissants
Take the dough out of the fridge and roll out on a lightly floured surface into a rectangle measuring 25 x 60cm and 5mm thick. “Fluff' the dough before trimming to avoid it shrinking back after cutting.
Mark up the dough at 10cm intervals along the 60cm side. Do the same on the other side but start 5cm along, so that the marks are in the middle of the ones opposite. Make a small vertical cut about 1cm long in the centre of each triangle's base. Cut into triangles with a sharp knife. To roll up a triangle gently stretch it by about 5cm, open up the cut a little and roll gently from base to point without squashing the dough. Leave the point underneath to stop the croissant from unrolling.
Place onto prepared baking trays, well spaced to allow for rising. Brush gently with the egg glaze (being careful not to let any drip onto the tray). Leave the croissants to prove somewhere warm and draft free for about 1 1/2 hours.
An oven with a tray of hot water in the bottom works well for this or cover the trays with plastic supported by upturned mugs to prevent the egg wash from sticking. The ideal temperature is 22-24C but don't exceed this as the butter will begin to melt and you will lose the layers.
Pre-heat the oven to 200°C or 180°C fan.
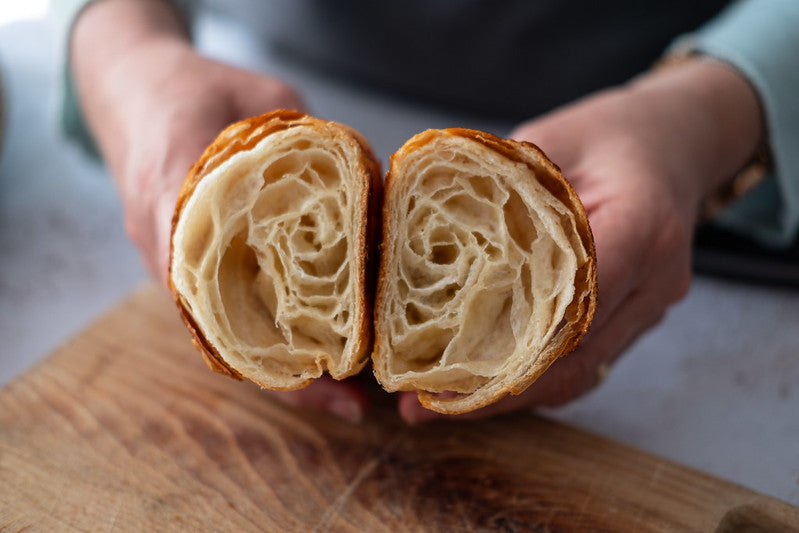
When the croissants are ready they will have risen, you should be able to see the lamination clearly and the croissants should wobble when the tray is shaken. When gently pressed with a finger the dough should not spring back.
Glaze again with egg wash and bake for 20 minutes until golden. Cool on wire racks.
Link copied to clipboard!